Image Upscaling
What is Image Upscaling?
Image Upscaling increases the resolution of images to make them appear sharper and detailed. Upscaling improves the quality of low-resolution images to make them useable in larger sizes and higher resolution displays. They use interpolation and enhancement techniques to fill in missing pixels based on the surrounding pixels and improve the overall quality of the digital image. The upscaled images have higher pixels per inch (PPI). Image Upscalers that use AI to increase performance, provide batch processing features and optimize the workflow by removing the need for a human to manually do each set of tasks for each are the focus of this article.
This article shows you the AI Software Choices, how to upscale manually with any graphic design software you choose and ends with examples of images that I upscaled manually with Krita.
Who invented Image Upscaling?
Many researchers in computer graphics and image processing concepts, developed image upscaling and enhancement techniques over many years. The earliest examples of image upscaling techniques are found as far back as the 1960s and 1970s with the field of image processing continuing to evolve and improve ever since. Development of specific techniques and algorithms for image upscaling based on machine learning are being developing in recent years.
Image Upscaling Use Case
Enhancing low-resolution images for display on high-resolution screens or for printing is a great use case. For example, an image that was created with an AI Art Generator might be of low resolution and appear pixelated or blurry when enlarged. Using an image upscaler will improve the quality of the image and make it appear sharper and more detailed.
Another use case is in the field of video restoration with a low-resolution video being upscaled to a higher resolution in order to improve the overall quality of the video. This is known as Super Resolution.
Image Upscaling can be used in the field of video and image compression, with the upscaling techniques as part of the decoding process to improve the final quality of the image or video.
Manual Image Upscaling
I show how to use Krita on pc laptops with windows operating system if you do not have access to any Image Upscalers. You can use any standard graphic design software to manually upscale any image.
Step 1: Create New Image with a minimum of 300 dpi / pixels per inch. Most of my projects require square images, so I start with a minimum width and height of 600. I leave the default settings for SRGB. I start with 600 width and height and manually increase the width and height in double size or smaller increments later as needed.
Step 2: Your brand-new blank image project is open in your preferred software (Krita in my case). It has the default workspace layout and default new project settings.
Step 3: delete project layers if they are not needed.
Step 4: Drag your low-resolution image into your project as a new layer. My original low-resolution image is named “DogTardigradeWaterbearWallMural.png”. No spaces in the file name and a descriptive name to make image production work more efficient with my team.
Step 5: Use the Scale & Drag Tool to Select & Drag Scale your low-resolution image to fit in the 600 x 600 square of your new project.
Step 6: Copy & Paste this newly scaled layer to make a backup copy of the original. Lock your backup copy layer.
Make sure you are viewing your image at 100% or higher resolution if you plan to do hand drawing over this image to correct, edit, change colors, sizes, layout, etc. I usually do hand drawing at this stage with many relevant layers while moving my project view between 100% to 800% to verify my new edits look the way I want them. I create new paint layers, fill layers and relevant layers to make my experiments nondestructive. I edit, move, remove and add new layers at will in a nondestructive way.
This technique allows me to play with colors, shapes, textures and more. Save your project file with all the separate layers in the format for your graphic design software (.kra for krita, .psd for photoshop, etc) so that you don’t accidentally lose all your work.
Save this graphic design format file often as you work. The project file should have no spaces in the name and should be very relevant to the contents so that if you only see the file name in a massive list of files, it is immediately clear what this project file is for and about. I named our project file “DogTardigradeWaterBearWallMural.kra”
Step 7: When you are satisfied with your work, save your .kra (or .psd) file a final time for this work session. Now you will move onto the final manual upscale tasks to get this new image in the proper size, resolution and file format for your requirements.
Step 8: Merge all the layers in your project into one layer. Review your image at less than 100%, at 100% and higher than 100% to verify everything looks the way you want it to look.
Step 9: Add your relevant watermarks.
Step 10: Ctrl + Alt + I to verify the image is 300 pixels per inch and size is 600 width x 600 height pixels.
Step 11: File > Export As > choose your file format (png, jpg, etc) and save the file with a name that is most relevant to what the viewer sees, with no spaces. I also like to add my artist name and ‘600’ to the end of the descriptive file name to make our time more efficient on my team. I named my file “CuteWaterBearRedYellowWallMuralMoniGarr600.png” in this example.
Step 12: Now I double the size of my project from 600 to 1200 as follows: Ctrl +Alt + I. Change width and height to 1200. Review the image at less than 100%, at 100% and above 100% to verify the image looks as I want it too. If I need to repeat Step 6 to sharpen anything or remove any artifacts, I save the project file (projectname.kra or projectname.psd) as a new file by adding ‘1200’ to the end of the project file name. When I am happy with how this looks with 1200 width and 1200 height, I Export As > “CuteWaterBearRedYellowWallMuralMoniGarr1200.png” in this example.
Step 13: I repeat Step 12 to increase / double the size of my image to 2400 width and 2400 height. Review everything looks as I want. Save as “CuteWaterBearRedYellowWallMuralMoniGarr2400.png” in this example.
Now I have the image in various resolutions to work in many different projects for web, print, virtual reality, augmented reality, 3D projects and more.
AI Image Upscaling Online
You will need an internet connection and web browser to use the following image upscaling services. Some of these are free to use, some offer free trials and most offer their services for a fee. Options are listed in alphabetical order here.
Aiseesoft: upscale to 8x. Ultra-high Resolution.
Crea8tiveAI: 4K. upscale to 16x.
Deep Image AI: upscale to 4K. Batch Processing. API.
Image-Upscaler.com: upscale to 2x
Remini Web: 2K. works best for faces and face-on photos.
Upscale Pics: upscale to 2x. Remove Artifacts. Improve Tone & Details.
VanceAI: upscale to 8x. Noise Reduction. Remove Blur. Anime. Compress & resize.
Waifu2x: upscale to 2x. Anime. Noise Reduction. Batch Processing.
Zyro: 2x upscale.
Image Upscaling Software
You can use the following image upscaling software on your own computer and do not need an internet connection to use them. Of course, you need an internet connection to find them and download them for installation to your own computer.
Adobe Photoshop: “Preserve Details 2.0” is a built-in image upscaling feature that uses machine learning algorithms to improve the quality of upscaled images.
A Sharper Scaling: upscale to 400%. Windows. Mobile.
BigJPG: upscale to 4K. Batch Processing. Windows. Mac OS. iOS. Android.
ESRGAN (Enhanced Super-Resolution Generative Adversarial Networks): This is an open-source image upscaler based on generative adversarial networks that is used in video restoration.
icons8: upscale up to 4x.
Imglarger: Batch Processing. Fast. Windows. Mac OS.
Let’s Enhance: 4K image upscaling. Windows. Mac OS. Artifact Remover. Smart HDR & Color Enhancement.
NVIDIA DALI: This is a library that provides a set of image pre-processing and augmented functions mainly used on the GPU, such as image upscaling.
Pixbim Enlarge AI: upscale to 4x. Windows, Mac OS, Linux…
Topaz Gigapixel: upscale to 600%. Batch Enlarging. Shake Reduction. Focus Correction. Enhance Edge. Correct Blur. Face Refinement. Recover Real Detail. Windows. Mac OS.
VanceAI PC: upscale to 8x. Noise Reduction. Remove Blur. Anime. Compress & resize. Batch Processing.
Image Upscaling Examples
The following will show images that I generated with a local Stable Diffusion python script along with an upscaled version and details about the upscaling software used to produce the upscaled version of the original AI Art Generated image. The AI Text Prompt was designed as a result of my previous experimentation with Unbundling Michelangelo’s epic art works.
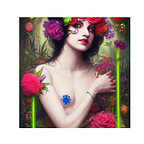
Original Image
generated with local Stable Diffusion python file on a windows pc.
- 442 width x 440 height.
- 32 bit depth
- 388 kb size
- 100 dots per inch / ppi / resolution
Image Upscaled
- 600 width x 600 height
- 40 bit depth
- 1.19mb size
- 300 dots per inch / ppi / resolution
Image Upscaled: 2x
- 1200 width x 1200 height
- 48 bit depth
- 3.80 mb size
- 300 dots per inch / ppi / resolution
Image Upscaled: 3x
- 2400 width x 2400 height
- 48 bit depth
- 10.3 mb size
- 300 dots per inch / ppi / resolution
This is a good enough resolution for image stock libraries that want high quality images to print on fabric, canvas, wall murals and more. You will want to upscale more for larger prints and displays.
Image Upscaled with AISEESoft
If you find my articles about AI Art useful, let me know in the comments.